Integrating a Form With the Database Manager
The database feature allows you to quickly gather and sort information from your website visitors, using a Form.
- Creating a Database
- Creating a Form
- Integrating Your Form With the Database
- Verifying Form Results Sent to the Database
Creating a Form That Will Work With Your Database
Now that your database is set up, it is now time to create the form. You can follow the same steps found on the Form Set-Up page. When creating your fields, make sure the field names exactly match the fields you are using in the database (including capitilization).
[Back]Integrating Your Form With the Database
Once you are finished building the form, use Edit Table Properties > Table to bring up the Edit Form window.
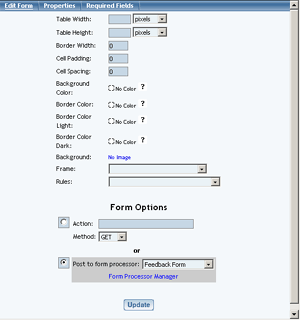
- Click the link for Form Processor Manager
- Click Edit next to the Form Processor you are using

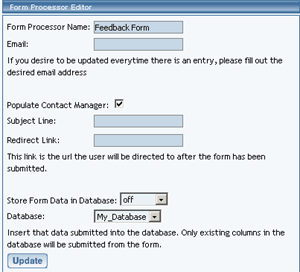
- Set Store Form Data in Database to either Auto or Approve, and choose the database you would like the form to send to.
- Click Update
Verifying Form Results Sent to the Database
If you set the Store Form Data in Database setting of Form Processor Manager to Auto, all results from the form will be automatically sent to the matching fields of your database. However, if you chose Approve instead, you will have to return to the Database Manager to approve or decline the results.
- Go to the Database Manager
- Click Approve Form Data at the top of the window
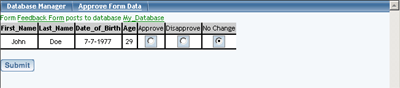
- For each entry, choose Approve, Disapprove, or No Change
- Click Submit
Any approved entries will be added to your database (they will not appear on site until after Publishing). Disapproved entries will be removed forever.
[Back]