Items
Related Links: 10-Step Guide on Setting Up E-Commerce | Product Catalog ManagementOverview | Adding Items | Item Management Page | Related Products | Upload Items | Download Items | Manage Inventory
Overview
Any product that will be sold from the Web site must be added as an item within the software.
Use the Product Catalog Management Administration section to add, remove and modify items ( products and package components ) that are used in the online catalog.
The first step when creating an online catalog is to create the items that will be used as products. Items are added through the product catalog management system, and then these items are either added to categories, or used as components ( "package options" ) in packages.
An item can be:
- An actual tangible product that will be sold on the Web site
- An item which allows customers to collect money for non-tangible goods
- To pay bills
- To collect donations
- To sell services
- A product component or "package option"
A product component, referred in the software as a package option, is an item that has been created that will be used as a part of a package. A package is a product bundle, and allows site owners to provide customers with purchase options. For more information on packages, please see the complete section on packages or the 10 Step Guide to Setting Up Ecommerce.
In some cases, a package option may also be sold independently in the catalog. In such cases, the item is added to any desired category and sold like any other product, and the package option, created by editing the item, is used within a package.
In other cases, an item may be specifically created for use in a package (with at least on package option defined for this item), and would not be available for purchase outside of the package.
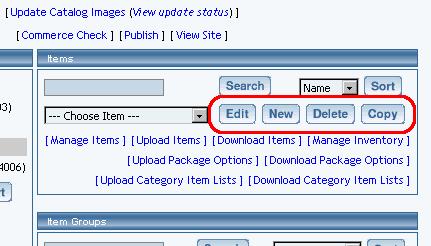
All specific details for any products or services sold in the product catalog are managed by creating and/or editing items.
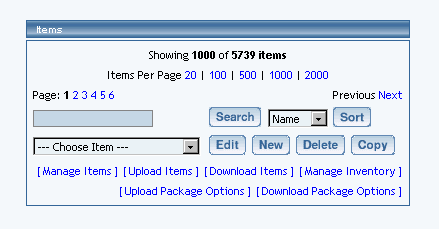
Please note, that if you see the following instead,...

...your product catalog is very large and has been moved to another page to make it more efficient for you to edit your products:
-
In this Item Management window, click on the blue numbers next to the text "Items Per Page" to increase or decrease the number of items to display in the drop-down menu. Click on the page numbers next to the text "Page" to browse between different portions of your items.
Navigation: To access the catalog management section, click on the main "Ecommerce" link at the top of any main administration page. Click on the "Product Catalog Management" text link to load the product catalog management page.
All products (and product components) that will be used in the catalog must first be added as items.
To edit an existing item, select the item to edit from the drop down menu, then click on the "Edit" button. The item management page will open in a new browser window.
To delete an existing item, select the item to delete from the drop down menu, then click on the "delete" button.
To copy an existing item, select the item to copy from the drop down menu, then click on the "Copy" button. Type the new item name in the prompt window, and click "Ok". The current page will refresh, and the item management page will open in a new browser window.
To search for items, type the item name in the empty text field located just above the item drop down menu and click the "Search" button. Once the page reloads, all matching items will be available for selection in the drop down menu.
To sort the drop-down list of all of your products, choose either "Name" or "Item ID" in the drop-down menu to the left of the word "Sort". Then click on the button "Sort".
To manage the general properties of all of your items, click here for more information.
Adding an Item
Before any products or product components can be used in the online catalog, each must be added as an item.
An item can be:
- An actual product for sale
- A product or a product component that will be used in a package
- Both a product and a package component

A dialog box will appear. Type in the name of the new item, and click "ok". Once the item name has been defined, the item management page will open in a new browser window.
Back to the Top of the Page
Item Management Page
Modify item specific information, such as descriptions, pricing, inventory, product image, and item rules.
The item management page is used to modify item-specific information. All item details are managed by accessing this page.
Use the item management page to:
- Add or modify product details such as the product descriptions, the product weight, and the product pricing
- Activate, deactivate or make inventory adjustments.
- Access item specific rules
- Change or define an item's package options
- Modify or create an item's options
Navigation: Click on the main "Ecommerce" link at the top of any main administration page. Click on the "Product Catalog Management" text link to load the product catalog management page. The item management page is loaded in a new browser window any time a product item is added or selected for editing.
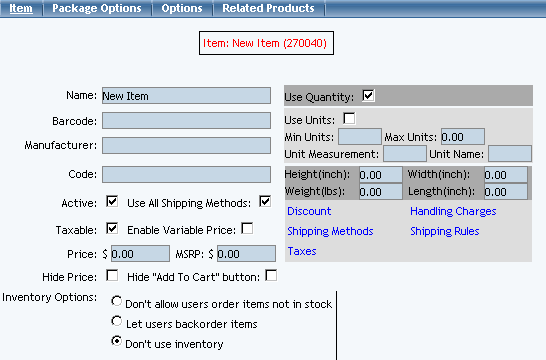
Reference the following guide when adding or changing any product/item information:
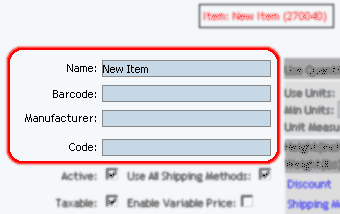
Enter the product name, item barcode identification number, product manufacturer, and product identification number (code) in the fields provided. The product name is the only required field in this area.
Check the selection box next to "active" if this item is to be available for use in the catalog. Items that are not active will not be displayed or available for purchase from the Web site.
Check the box next to "Use all available shipping methods" if this item will be shipped using all active shipping methods. If this box is not checked, then shipping methods must be manually selected by accessing the item shipping methods page.
Check the box next to "taxable" if this item is being sold as retail goods.
Check the box next to "variable pricing" only if the amount to pay is determined by the customer. Checking this box will result in a blank field appearing on the item order form, allowing customers to type in a dollar amount to pay for this item.
Variable pricing is ideal for:
- Allowing customers to pay invoices online
- Collecting donations
- Selling gift certificates
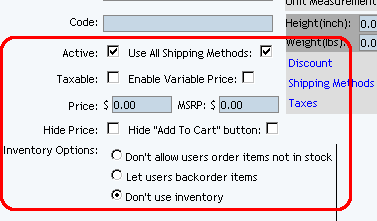
Enter the Retail Price in the field provided. This is the base-price a customer will be charged when purchasing the item.

Optionally, enter the manufacturer's suggested retail price (MSRP) in the field provided. If this value is greater than zero, it will be displayed above the retail price on the item page in the catalog. If no value is entered, the MSRP will not be displayed.
Checkmark the checkbox "Hide Price" if you only want to hide the price of this item, rather than all items. Checkmark the checkbox "Hide 'Add To Cart' button" if you want to hide the "Add to Cart" button for this item, rather than for all items. Please keep in mind that this setting is overridden by the Catalog Component's ability to hide prices and hide the "Add to Cart" button for all items.
Under inventory options, click the radio button next to desired selection. The default is "no inventory" which will deactivate the inventory control system for this item.

Selecting "Don't allow users to order items not in stock" will activate the inventory control system. The system will not allow a customer to purchase any items out of stock or that exceed the available inventory (items with zero inventory will still show up in any active categories that contain the item).
Selecting "Let users backorder items" will allow customers to purchase and pay for items regardless of quantity on hand. All products which are listed as being out of stock will automatically be placed on back-order.

When the inventory control system is activated, inventory-tracking information will appear. To modify inventory, enter the number of units in the field provided, next to "Add Inventory". To add inventory, enter a positive value. To remove inventory, enter a negative value.
A running total of inventory is kept and displayed, with the current stock and total items sold listed. To complete an inventory adjustment, click on the "update" button at the bottom of the administration page.
The "Published Inventory" section will not reflect any inventory adjustments until the Web site is published.
Enter any warranty information, a short description, a main description, Meta Keywords, Meta Description, and Instruction in the fields provided. All of these fields are optional.
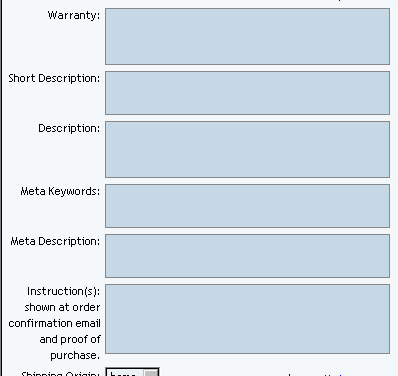
The short description appears at the category level in the catalog. It is also used as the primary description if the item is used as a package option or if an item is used in an express order form.
The main description appears on the main item page. It is used to provide detailed product information and any necessary product specifications. The Meta Keywords and Meta Description are only used for search engine information, and will not be visible to Web site visitors. Enter key words that apply to this item and a short description of this item in the spaces provided.
The Instruction text area gives you the ability to place a block of text that will appear at the end of a successful order. This text will appear on the order confirmation page, on the order fax sent to the site owner, and in the e-mail confirmation sent to the customer and to the site owner.
Select a shipping origin from the drop down menu provided.

Select an image to use with this item by clicking on the current image name or on "no image" if an image has never been selected. The image selection page page will load in a new window.

The quantity and unit of measure options are located toward the upper right-hand corner of the administration page.
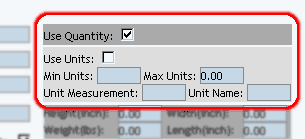
Uncheck the "Use Quantity" box only 1) to prevent a customer from being able to specify the quantity to order or 2) To use a custom unit of measure in place of a generic quantity.
When the "Use Quantity" box is checked, a customer is able to order multiple quantities. If the "Use Quantity" box and the "Use Units" boxes are both unchecked, a customer is not able to specify any quantity for purchase. This combination is primarily useful if non-tangible goods are being sold.
The "Unit" feature provides a method to specify custom units of measure, such as "yards", "packs", "cases", "ounces", or any desired custom unit. The unit feature can be used as a replacement for the quantity, or both quantities and units can be used. When the unit feature is active, customers can specify fractions of a unit, i.e. 1.5 cases, 3.75 yards, etc.
Specify the unit being measured in the in the field provided next to "Unit Measurement".
Examples of Measured Units:
- Bottles
- Cases
- Boxes
Examples of Unit Names:
- Ounces
- Feet
- Yards
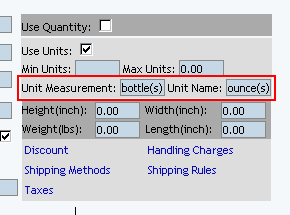
If quantity and units are both active, as an example, a customer could order 10 qty. of 8 ounces of the item, or 5 qty. of 12.5 feet of rope.
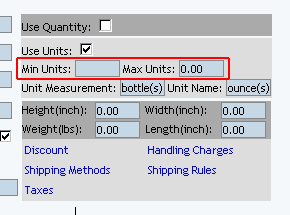
Entering a value for "Min units" will prevent a customer from ordering less than the value entered. Entering a value for "Max units" will prevent a customer from ordering above the specified value. If "Max Units" are not specified, a customer will be able to order an unlimited amount of the item.
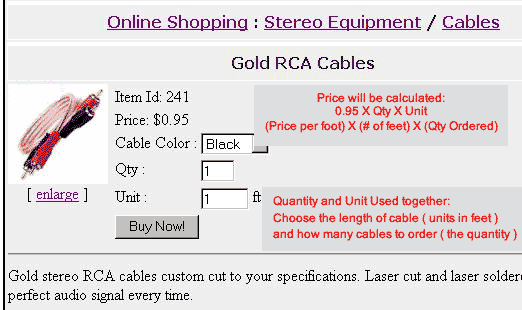
[ An example of quantity and units used together ]
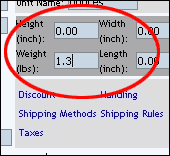
Enter the height, width, weight and length of the item in the fields provided. All of these fields are optional. However, the integrated shipping methods require a value for weight in order to calculate shipping charges.
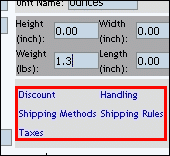
Click on the "discount" text link in order to access and set up item discount rules.
Click on the "handling" text link in order to access and set up item handling charge rules.
Click on the "shipping methods" text link in order to access and set up item shipping methods.
Click on the "shipping rules" text link in order to access and set up item shipping rules.
When completed, save any changes to the item by clicking on the "update" button located at the bottom of the administration page.

If this item will be used as a package option, click on the "Package Options" link at the top of the administration page.

Click on the "Options" link at the top of the administration page to set up any item-specific options.

Related Products
Click on the tab "Related Products" to assign products that are related to this product. For example, for a professional sports team jersey and matching cap, the baseball cap would be a related product of the jersey.

When you click on the "Related Products" tab, you will see the following screen:
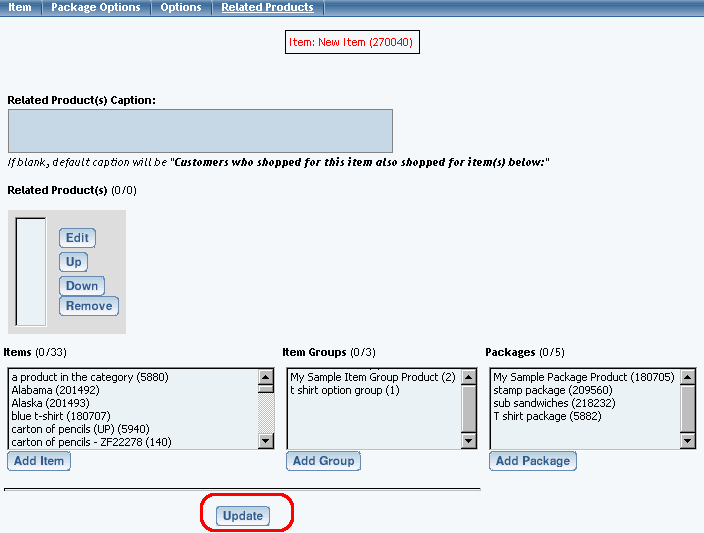
The first section details the caption you would like to have on the Web site. This caption will be next to all of your assigned related products. If nothing is assigned, the default caption will be "Customers who shopped for this item also shopped for item(s) below:".

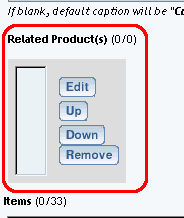
The second section details all of the related products that are currently related to this product. Order the products by clicking on the nam of the product and clicking on the "Up" or "Down" buttons. To jump to the item management window for the related product, select the product and click on the button "Edit". To remove the product as a related product, click on the product name and click on the button "Remove".
To add a related product, you would use the third section. In each group of products (Items, Item Groups, and Packages), click on the product name and then click on the appropriate add button ("Add Item" button if you are adding an item, the "Add Group" button if you are adding an item group, and the "Add Package" button if you are adding a package). Once the product name is listed in the second section, it has been applied.

When done specifying all of your related products for this product, click on the button "Update" to save your changes.
Related Links
Item Discount Rules
Item Shipping Methods
Item Shipping Rules
Item Tax Rules
Item Handling Charges
Item Package Options
Item Options
Back to Item Management Page
Back to the Top of the Page
Upload Items
The upload item page is used to upload a spreadsheet that contains all item/product details in record form (a tab delimited text file). This feature can be used to upload new items or update existing items.
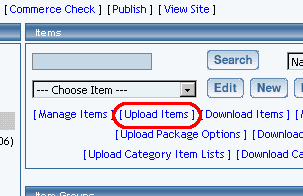
Navigation: Click on the main "Ecommerce" link at the top of any main administration page. Click on the "Product Catalog Management" text link to load the product catalog management page. Click on the "Upload Items" text link located in the items section of the catalog management page.
-
Adding New Items:
Prepare a spreadsheet which includes the details of all items (with a program such as Microsoft Excel). Save the document as a tab delimited text document: "items.tsv". In Excel, click on File, then choose "Save As". From the list, select "Text (tab delimited)".
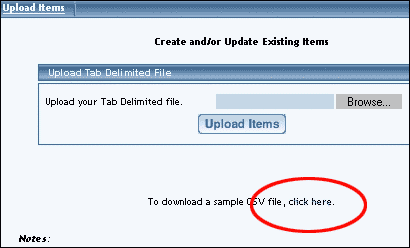
An example of a tab delimited text file is provided. To view this document, click on the "click here" text link provided.
Updating Existing Items:
To update the details of existing items, first download the tab delimited text file which will contain all current item information. Load this file into any spreadsheet software. Update any item information as necessary, and add any new items as needed. Save the file in the same tab delimited text format.
Uploading the File:
Click on the "Upload Items" text link, which will load the product upload page in a new browser window. Click on the browse button, and browse your local hard drive to select the tab delimited text document that contains your product item details. Click on the "Open" button in the file browser window to finish selecting the file to upload.
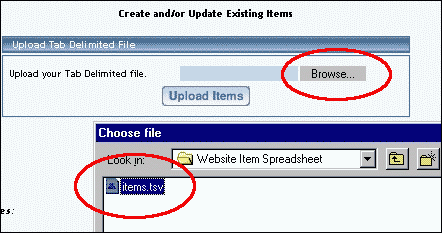
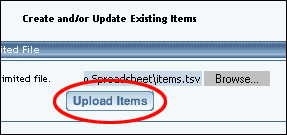
After selecting the file, click on the "Upload Items" button.
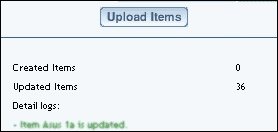
The page will refresh and present the number of items successful added and/or updated. A itemized status report will load, allowing confirmation that all desired changes were made.
Tip: Create at least one complete item by entering all pertinent details from the product catalog management page. After updating, download the tab delimited text file by accessing the download items page. Load this file into a spreadsheet management software package, such as Microsoft Excel. Enter all necessary item information beneath the fields provided (the item(s) already entered will provide a starting point for all remaining products).
Back to the Top of the Page
Download Items
A tab delimited text file may be downloaded which includes the item details for each product/item in your catalog.
Navigation: Click on the main "Ecommerce" link at the top of any main administration page. Click on the "Product Catalog Management" text link to load the product catalog management page.
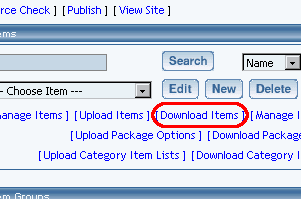
Click on the "Download Items" text link. The item download tool will open in a new browser window.
Select any desired optional fields to include by clicking in the checkbox next to the option. When finished, click the "Download" button.
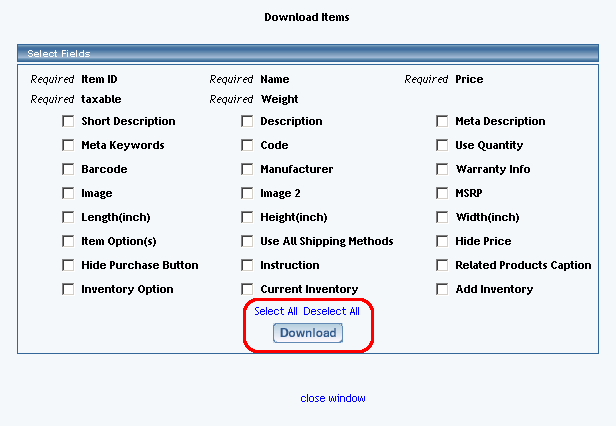
A dialog box will appear, providing an option to either open or save the file.

The default file name will be "items.tsv". For best results, open the "items.tsv" file with a spreadsheet application, such as Microsoft Excel, or a software application capable of importing a tsv (tab separated values)text document.
Back to the Top of the Page
Manage Inventory
From the Product Catalog Management window, click on "Manage Inventory".
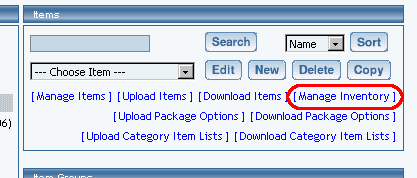
The system will then open up a new window and display the following:
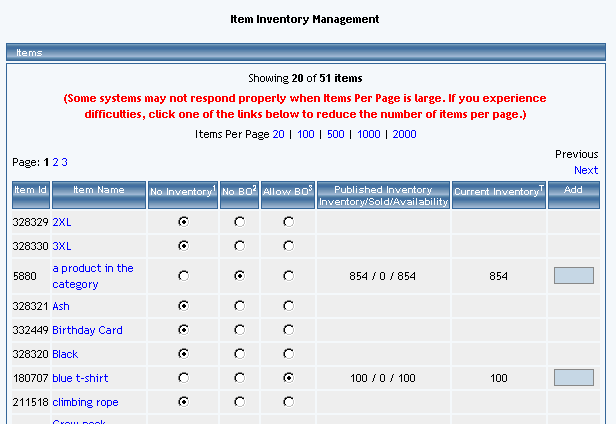
Click on the blue numbers next to the text "Items Per Page" to increase or decrease the number of items to display for iventory management. Click on the page numbers next to the text "Page" to browse between different portions of your items.
For the following header,...

...here are the explanations:
-
Item ID - the item ID for the product
Item Name - the name of the product
No Inventory - the product will not be using inventory management
No BO - the product will be using inventory management and the system will prevent the customer from backordering products. Allow BO - the product will be using inventory management and the system will allow the customer to backorder products. Published Inventory
Inventory/Sold/Availability - this column reports the published inventory that the Web site recognizes. The first number is the current inventory. The second number is the number of products sold. The third number is the number of available inventory of a product. Current Inventory - this column reports the inventory that the Web site recognizes - but not necessarily is published to the Web site. Add - put in a number to affect the inventory for a product. To add 20 of a product, you would place "20" in the available field; to subtract 20 of a product, you would place "-20" in the available field. A blue text box will appear if the product is using inventory management.
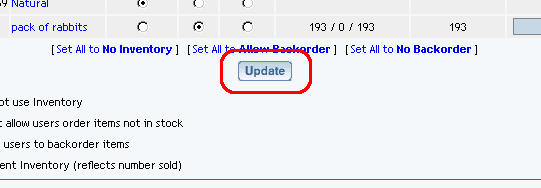
When done, you must click on the button "Update" to save your changes. You must also Publish the Web site in order to apply your changes to the Web site.

Product Catalog Management
10-Step Guide on Setting Up E-Commerce
Back to Previous Page