Tutorial #2
Using Your Own Images on Your Web Site
You can replace any image on your website with your own images. You start by editing the page that the image is on and and then selecting the existing image that you want to change. Here are the steps to upload your image to your Web site and use it on the page.
-
1. Log in to your Web site administration, select your Web site, and click the "Edit" link to the far right of the page whose image you want to change.
2. Move your mouse over the image that you want to change, and click your mouse button (the left button, on most systems). In the small option window that pops up, click "Edit".
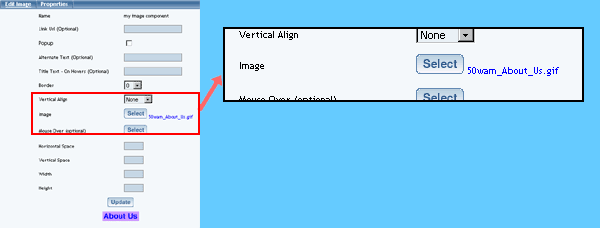
3. In the new window that appears, you will see many options. Change the options that you desire. To select another image to use on the Web page, click on the button "Select" next to the text "Image".

4. In the new window that appears, click on "Upload Image" to upload the image file from your computer to the Web site.
5. Click on "Browse". In the new window that appears, search through your computer and click on the filename of the image you want to upload to the Web site. Click on "OK". Click on "Upload".
6. A preview of the image you uploaded will be displayed. Click on the button "Use".
7. Click on the button "Update".
8. Your image will now be shown in the editing window. Make sure to Publish the Web site so that Web site visitors will be able to see your new image.
Learn More About...
- image basics
- image options
- resizing, cropping, and adding transparency to your images using the Image Tool
- Publishing your Web site
- Selecting another location of your new image

|

|